
Article Summary
Drawing a sphere means mastering shading to create realistic depth. This article covers pencil selection, tracing a circle, and layering highlights, midtones, and core shadows. You'll gain the foundational skills to draw a sphere that looks convincingly three-dimensional.
 Learning how to draw simple, three dimensional shapes like cubes and spheres is great practice for artists looking to hone their technical drawing skills. If you can sketch, draw, and perfect nature’s most basic shapes on paper, you can learn to draw anything with ease, with a little practice, of course.
In this step-by-step guide, we’ll learn how to draw a sphere, which includes forming a perfect circle and shading correctly.
Disclaimer: The reference images in this tutorial are originally from PencilSessions.com, a site that hosts numerous guides for drawing shapes, animals, and textures.
Finding the Perfect Pencil
If you’ve been drawing for a while, you’re likely aware of the graphite classification system, and have found the pencil or pencils that you feel most comfortable drawing with. If you’re new to drawing, graphite is classified as follows:
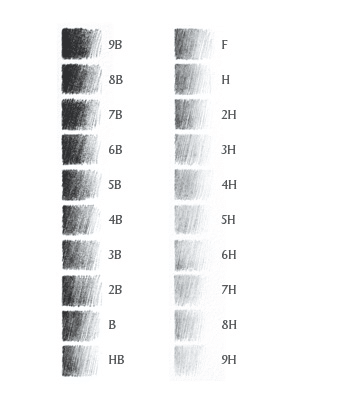
A standard #2 pencil would be considered HB, on this chart. Your pencil choice is up to you, but the example drawings used in this guide were drawn with 3B-HB pencils, so if you want to achieve the same tone, you would use those.
Harder graphite is usually best for quick sketches, because it leaves lighter marks and is harder to smudge. Softer graphite is best for shading because it can get very dark, and is easy to smudge.
How to Draw a Sphere
A drawn sphere is made up of different “parts,” all products of the lighting you’re trying to emulate in your drawing. These “parts” or “sections” are:
- Highlight: The highlight is the lightest part of your sphere, where the light source directly hits.
- Midtone: The midtone is the shading in the part of your sphere where the light is not directly hitting. It is still in the light source’s line of sight, but not direct enough to be as bright as the highlight. It is the middle tone of the sphere.
- Core Shadow: The core shadow of your sphere is the part of the sphere where the light from your light source does not hit, at all. It is the darkest part of the sphere, and directly opposite from the light source.
Before you start drawing, you’ll need:
- A sheet of paper
- 3B-HB pencils
- Cotton balls or tissue
- Something circular to trace
Wait, what’s that? Trace? I know, I know, you’re trying to learn to draw here. However, in order to draw a perfect sphere, you need to know how to draw a perfect circle, and this is hard. It takes a lot of practice and precision to master, so to save time, just bear with me and forgive yourself this one shortcut!
Of course, if you must draw your own circle, no one’s stopping you. More power to you if you manage to draw a nice looking one on your first try! Enough banter, though; let’s get started.
Step 1 – Trace a circle
Grab something circular, like a cup or a small bowl, lay it flat on the paper, and trace the circle.
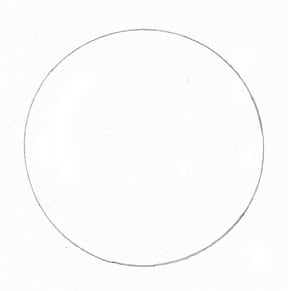
It’s cheating, yes, but it’s okay for now. The reason we’re learning how to draw a sphere, and not a circle, is because a sphere needs to be shaded properly, which is where the real learning begins.
Step 2 – Lightly fill in the sphere
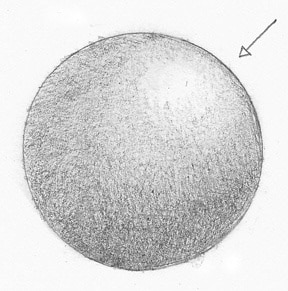
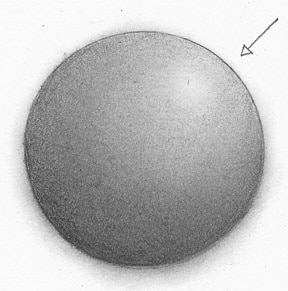
Very, very lightly, begin shading the sphere using quick, gentle sketching motions. Decide your light source, and shade around that space.
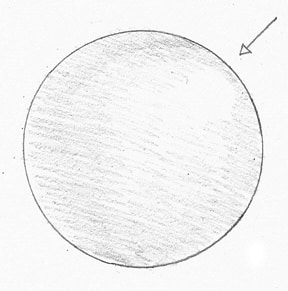
In this example, the light source is represented by the arrow, and as you can see in the example drawing from Pencil Sessions, there is patch immediately in front of the light source that is left unshaded.
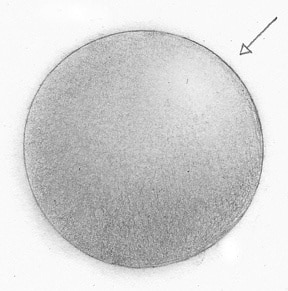
Step 3 – Smooth out the shading with a cotton or tissue piece
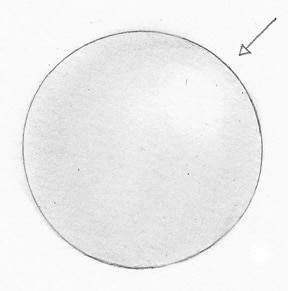
Iron out that grainy, graphite look with a cotton ball or a small corner of tissue, giving your sphere a smoother, reflective looking surface. Take caution not to smear your graphite too much out of the lines, or to smudge your light source’s reflection.
Step 4 – Darken the shadows
Return to shading the sphere, this time darkening out the areas where the light source does not hit. This is the midtone.
Step 5 – Smooth out the shadows
Repeat the process from Step 3. Using a cotton ball or corner of tissue, smooth out the graininess of the shadows you just added, taking care to leave the light spots where they should be.
Step 6 – Darken the outer edges
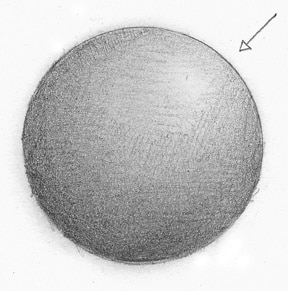
Shade the shadows again, this time paying closer attention to the outer edges of the sphere opposite the light source, and on either side.
Step 7 – Smooth out the shadows
Smooth out the graininess of your newly added shadows once again. We want the smoothest looking sphere possible!
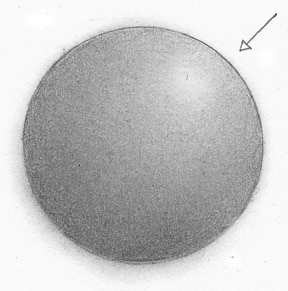
Step 8 – Darken the side opposite the light source
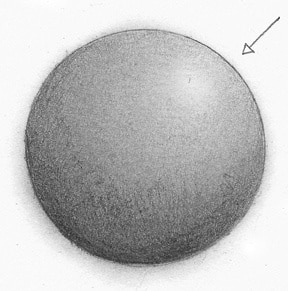
Shade the sphere more, focusing especially on the border of the circle opposite the light source. Use your 3B pencil for added darkness. Start moderately dark along the border, and branch out your shading in a crescent shape. The root of this shading is the core shadow.
The light source is going to add a shining, reflective circle opposite your newly added shadows, called a highlight. Imagine the patch you’ve been leaving unshaded is a perfect circle, and shade in a crescent around that. Examine the example closely, and you should see what I mean.
Step 9 – Smooth out the shadows
If you want a smooth shade with graphite, it’s all about the cotton and tissue! Smooth out your new additions, as you’ve done before.
Step 10 – Clean it all up!
Erase all the smudges and out of the line marks that have made their way outside your perfectly shaded sphere, taking care not to erase anything within your circle. After that, admire your new creation! (And thank Pencil Sessions for the awesome step-by-step example drawings.)
You’ve done it! For more drawing tips, consider branching out with a course on figure drawing techniques, or try your hand at portrait drawing.
If photorealism isn’t for you, consider developing your own cartoony drawing style, and learn how to draw caricatures.