
Article Summary
The elliptical marquee tool in Photoshop selects oval and circular areas of an image for cropping, copying, or creative edits. This article covers basic and advanced selection techniques, keyboard shortcuts, combining tools, and creating vignette effects. You'll gain practical skills to make precise elliptical selections confidently.
We covered how to use the rectangular marquee tool in a previous tutorial. In this tutorial, we will learn how to use the marquee tool to make elliptical selections. Both these tools are largely similar, albeit with a few differences. By the end of this tutorial, you should be able to create complicated selections easily with the marquee tool.
You can learn more about selections and masks in Photoshop in this course.
How to Use the Elliptical Marquee Tool: A Step-by-Step Tutorial
The chief purpose of the elliptical marquee tool is to make, well, elliptical selections. We saw how we could use the rectangular marquee tool to make simple rectangular selections. We will apply the same principles to create round selections.
For the purpose of this tutorial, we will recreate this simple image:

Step 1: Download these two images from PixaBay to get started [1][2]. We will use these to create our ‘cat picture frame’.
Step 2: Open the first cat image in Photoshop.
Step 3: Locate the elliptical marquee tool in the left toolbox. You may have to click and hold the rectangular marquee tool to bring up the marquee tool selection panel, as shown below:

Step 4: Click and hold the mouse and draw an oval shape around the cat’s face, as shown below:

Step 5: Hit CTRL + C or got to Edit -> Copy to copy the selection to clipboard.
Step 6: In a new Photoshop window, open the second image of the frame.

Step 7: Hit CTRL + V or go to Edit -> Paste to paste the previously copied cat’s face in the new image.

Step 8: Drag the pasted image around until it fits the frame perfectly. You can also resize this image by hitting CTRL + T or going to Edit -> Free Transform.
Step 9: Drag the cat’s face layer below the frame layer in the Layers panel to give the impression that our frame is overlaying the cat’s face.

Step 10: Add a background layer. To do this, click on the Create new fill or adjustment layer button in the Layers panel.
Select ‘Solid Color’ from the pop-up menu. Pick a color of your choice. For this example, I’m choosing plain white.

Step 11: Drag this newly created solid color layer beneath all other layers in the Layers Panel.

This is what your final image should look like now:

Congratulations, you just used the elliptical marquee tool to create your very own “cat picture frame”. However, as we will see below, we can use the elliptical marquee tool for a lot more than simple selections.
Using Photoshop for web designing? This course on Photoshop for web design beginners is a great place to start.
Making Advanced Selections with Elliptical Marquee Tool
The elliptical marquee tool might appear quite simplistic – all you can do with it is make round selections. However, properly used, it can be a powerful weapon in the Photoshop warrior’s arsenal.
Creating Perfectly Circular Selections
One of the most common uses for the elliptical marquee tool is to create perfectly circular selections. Think about the many times you’ve needed to crop, cut or copy a round object from an image – a ball, a frame, or as in this example, the moon.

The moon is not a perfect circle, of course, but it is close enough. To draw a perfectly circular selection around it, follow these steps:
Step 1: As before, open the image in Photoshop. You can find a copy of this image here.
Step 2: Select the elliptical marquee tool and draw a circular shape around the moon.
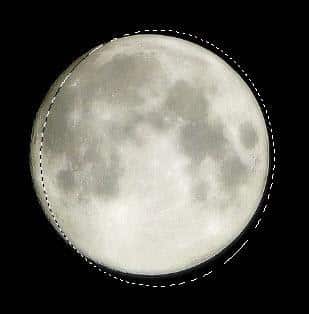
Difficult, right? With elliptical shapes, you never know where the circle will start from, or if you will even get a circular shape.
Fortunately, Photoshop offers a few workarounds:
- Hold down the SHIFT key to draw shape with a fixed aspect ratio. By default, this is 1:1, i.e. the shape is perfectly circular (or square, if you are using the rectangular marquee tool). You can change the aspect ratio in the selection style menu (more on this later).
- Hold down the ALT key to draw a circle from the center, as opposed to from the edges. This means that the circle will grow from your mouse pointer. This gives you far better control over the eventual shape.
- Hold down the SPACEBAR while drawing the shape to move it around.
It follows that by holding down ALT + SHIFT, we can draw a perfect circle that grows from the center. By holding down SPACEBAR, we can move this shape to get the right part of the image, as required.
With this trick, this is how our final selection looks like:
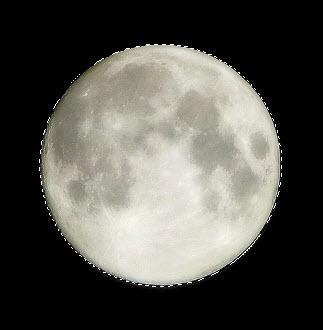
[Note: You can add some feather to the selection to give it a ‘soft glow’ effect.
![]()
Make sure to set the feather before you make the selection.
Step 3: Press CTRL + C to copy the selected part to clipboard.
Step 4: In a new document, press CTRL + V to paste the selected image. This is what my canvas looks like now:

Notice how the 20px feather adds a nice glow effect. We can now use this moon in any other image.

Completely new to Photoshop layers? This course will help you master layers in Photoshop.
Advanced Selections with Rectangular and Elliptical Marquee Tools
So far, we have used either the rectangular or the elliptical marquee tool separately. However, when used in tandem, these two tools become far more potent.
As an exercise, let us recreate the shape shown below:

Step 1: In a new document, use the rectangular marquee tool to create a square selection.

Step 2: Select the elliptical marquee tool. In the selection options, choose ‘Subtract from selection’.
![]()
As we learned in the rectangular marquee tutorial, this will subtract the selected parts from the original selection.
Step 3: Draw a circular shape inside the square selection such that it intersects the edges. Press and hold the ALT, SHIFT or SPACEBAR keys if required.

Step 4: Release the mouse. You should now have the following shape:

You can fill it with a color of your choice and it will make a nice border for any image.
Here, we have filled it with red and added our previously cropped moon image to its center.

We can use the same process to create more interesting shapes. For example, creating an oval shape then adding another oval shape to it using the Add to Selection option, we get this:

Removing the bottom part from this selection by using the Subtract from Selection option and creating another elliptical shape, we get this:

The possibilities, as you may very well imagine, are endless.
Adding a Simple Vignette Effect with the Elliptical Marquee Tool
So far, we have seen how the elliptical marquee tool can be used to make selections. We will now see how it can also be used to create simple image effects, such as the vignette effect.
For this example, we are going to use this image of a dog and a cat.
Step 1: Download a copy of the aforementioned image and open it in Photoshop.
Step 2: Add a new layer. Press SHIFT + F5 or go to Edit -> Fill and fill this layer with the color white.

Your image should now be completely obscured under the white color layer.
Go ahead and hide this fill layer by clicking the ‘eye’ icon to the left of the layer. This will allow us to work on the original image without obstruction.

Step 3: Make sure that the new layer we just created is the active layer (click on it in the Layers panel). Then select the elliptical marquee tool and set the feather to 20px.
![]()
Draw an oval shape around the dog and cat, like this:

Step 4: Make the white layer visible again and delete. This will delete the color inside the selection. You should see an effect similar to the one shown below:

Congratulations, you have just created your very first vignette effect!
Using the elliptical marquee tool is an important skill to acquire on your journey towards Photoshop mastery. As we saw, this tool can be used to create different types of selections and is useful for creating simple image effects as well.
To learn more advanced Photoshop skills, check out this course on Adobe Photoshop CS6 essentials.